Square update
Mon, 08 November 2010
Just a quick update on the problem I mentioned in the last post about using the Square reader on iPhone 4. Square sent me (and many other people, from what I read) a new reader that is not only iPhone 4-compatible, but also thinner and supposedly more tolerant to swiping speed inconsistency. It seems to work quite well.
Comments
A Square Deal
Tue, 28 September 2010
For those who haven't heard, there is a new credit card transaction processing company called Square. They provide a free card reader that plugs into the microphone jack of your cell phone/iPhone/iPad/Android device and the software to go along with it. You can see screenshots on their web site and in the App Store, so I won't belabor that point here. What I will do, however, is relate my experience and give my opinion about the device, software, and service.
It's been widely publicized that this service launched before it was quite ready. For example, I signed up in May but didn't receive my card reader until Friday (5 days ago, almost 5 months after I signed up). There was also a lot of talk about transaction limits that were too low and the amount of personal information they asked for. The software was originally announced for the iPhone, but then Square decided to detour and release the iPad version first. That put a lot of people off, myself included. The iPad version has features that the iPhone version doesn't, like the ability to enter an inventory of items for sale. On the one hand, that is understandable because of the iPad's much larger screen. On the other hand, there is really no reason (especially with the iPhone 4's and new iPod touch's Retina Displays) that these features can't be implemented on the iPhone as well. I'm sure that Square will indeed incorporate these features into the iPhone/iPod touch version at some point, but that's functionality that should have been available from the start as it was with the iPad version.
Enough griping — now that I have my reader, I've had a chance to actually try the service out. It's not perfect by any means, but wow… it's slick! If you want to use the reader with an iPhone 4 then be aware that the metal antenna band causes interference with the reader. Check Square's support site for information about ways to mitigate or even fix this problem. Once I put a piece of paper between the band and the reader to electrically insulate the two, the reader worked perfectly. I found the software straightforward and easy to use. Authorization and transaction commitment on Square's servers was fast and the transaction showed on my credit union's website within about half an hour. Controversy has arisen on Square's forums about their practice of showing their phone number, not the merchant's, in the transaction description. They claim they do this to reduce the time it takes to resolve transaction disputes, but I have a feeling Square will update their back-end software to give the merchant the choice of which phone number appears.
Overall, I'm impressed so far. I think the independent photographer now has the means to accept credit card payments that would have been cost-prohibitive to accept until Square came along. I hear rumors that Square will soon have some competition, which is good for us!
Now we're getting somewhere!
Fri, 09 April 2010
I actually started writing this post last month when I first saw an announcement in Professional Photographer magazine about DigiLabs' StudioShare iPhone app. It is perhaps fortuitous that I've been too busy to finish writing the post until now, because Apple's recently released iPad may take the subject to the next level.
Whether on the iPhone, iPod touch, or iPad, the ability for your clients to order prints and products in the spare moments they find waiting in line for their "venti double light skinny white chocolate mocca frappuccino blended creme with energy to go" will almost certainly increase your sales. I can't believe it took this long for someone to finally put the system together that makes such purchases from iProducts easy. Over at Aunt Myrtle's showing off your wedding photos? Now, if your photographer uses this DigiLabs product, you can order albums and prints for your Auntie while your spouse drives the two of you home — before you forget which ones she liked. If DigiLabs revises the software for the iPad's increased screen real estate it will even easier to preview the photos before ordering. Let's turn the scenario around… say Aunt Myrtle is over at your house for a visit. You can hand her an iPad and let her order prints and albums of your wedding from the comfort of the couch while you're in the kitchen finalizing dinner. No need to worry about a bulky laptop or whether she knows how to use a trackpad. It would even be easy enough for her to pace back and forth while making her decisions if she's a "pacer."
I think it's a foregone conclusion that more labs will integrate Apple's iProducts into their workflows and service offerings very soon. I can hardly wait!
A Case for iPhone HDR
Tue, 09 March 2010
Some may wonder why anyone would want to do high dynamic range (HDR) photography on their iPhone. I have to admit, I wondered that myself when I saw the TrueHDR app in the App Store. What I've found over the past few months of playing with TrueHDR (v1.0.1 at the time of this writing) is that it can help make up for some of the iPhone camera's deficiencies.
One of the problems with the iPhone camera is that the colors are often flat. I suppose color rendering ability is one of the areas in which designers have to compromise to cram a several megapixel sensor and optics into the space available in a cell phone. Phone cameras also are often used in less-than-ideal lighting situations. The question arises, then, what to do to compensate for poor rendering. Quite by accident, I discovered that TrueHDR may be one of the answers to that question.
I took the following two photos using TrueHDR's integrated picture-taking feature. One is exposed for the highlights and the other for the shadows. On their own, neither is remarkable (nor is the photo I took with the built-in Camera app).
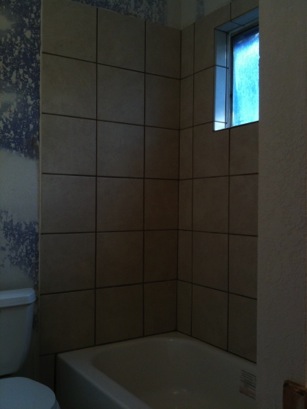
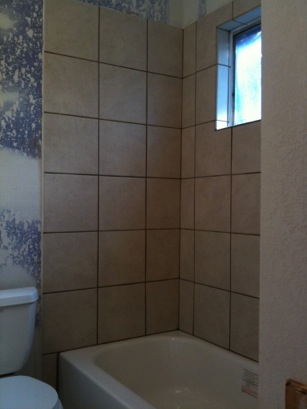
The exposures are actually pretty similar — more similar than they appear here on the Web. I expected a wider spread than what we see. However, when I told the app to merge the two exposures to compress the dynamic range, I got a photo that is much more true to the scene:

The result is a bit too saturated, particularly in the blue range (probably a white balance issue in the source images), but the overall color is more accurate.
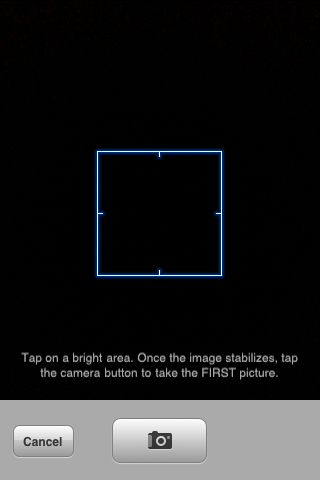
The app is straightforward and easy to use. It presents a screen upon launch which lets the user take pictures with the camera or use pictures from the iPhone photo library. If the user chooses to take pictures, a camera preview appears with instructions to tap on a bright area in the photo. Below is a screenshot of such a screen with the preview area dark to make it easy to read the instructions.
Once the user takes the first picture, similar instructions tell the user to tap on a dark area and take the second picture. The user then comes to a screen similar to this one:
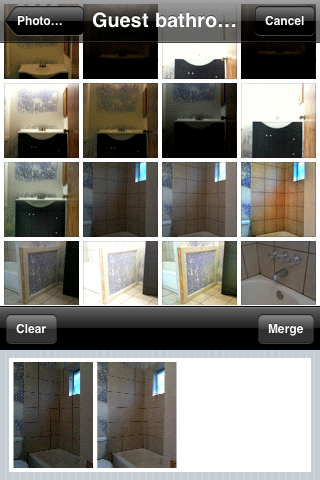
The screenshot above is actually what the user sees when merging photos from the library. When taking pictures, the user continues to see the camera preview in the top section of the screen instead of the photo chooser as seen here. Once you have the two photos to be merged showing in the bottom section, press the Merge button to have TrueHDR align and merge the images.


There you have it! Simple, easy to use, and effective. There are a few so-called HDR apps in the app store which do nothing more than apply a saturation boost to a single photo. The only other app at the time of this writing that does true HDR is Pro HDR. I intend to give that a whirl soon since it is the same price as TrueHDR but looks like it gives the user more control over the results. I will post a brief writeup about the app once I have purchased and used it.
One of the problems with the iPhone camera is that the colors are often flat. I suppose color rendering ability is one of the areas in which designers have to compromise to cram a several megapixel sensor and optics into the space available in a cell phone. Phone cameras also are often used in less-than-ideal lighting situations. The question arises, then, what to do to compensate for poor rendering. Quite by accident, I discovered that TrueHDR may be one of the answers to that question.
I took the following two photos using TrueHDR's integrated picture-taking feature. One is exposed for the highlights and the other for the shadows. On their own, neither is remarkable (nor is the photo I took with the built-in Camera app).
The exposures are actually pretty similar — more similar than they appear here on the Web. I expected a wider spread than what we see. However, when I told the app to merge the two exposures to compress the dynamic range, I got a photo that is much more true to the scene:
The result is a bit too saturated, particularly in the blue range (probably a white balance issue in the source images), but the overall color is more accurate.
The app is straightforward and easy to use. It presents a screen upon launch which lets the user take pictures with the camera or use pictures from the iPhone photo library. If the user chooses to take pictures, a camera preview appears with instructions to tap on a bright area in the photo. Below is a screenshot of such a screen with the preview area dark to make it easy to read the instructions.
Once the user takes the first picture, similar instructions tell the user to tap on a dark area and take the second picture. The user then comes to a screen similar to this one:
The screenshot above is actually what the user sees when merging photos from the library. When taking pictures, the user continues to see the camera preview in the top section of the screen instead of the photo chooser as seen here. Once you have the two photos to be merged showing in the bottom section, press the Merge button to have TrueHDR align and merge the images.
There you have it! Simple, easy to use, and effective. There are a few so-called HDR apps in the app store which do nothing more than apply a saturation boost to a single photo. The only other app at the time of this writing that does true HDR is Pro HDR. I intend to give that a whirl soon since it is the same price as TrueHDR but looks like it gives the user more control over the results. I will post a brief writeup about the app once I have purchased and used it.
It was only a matter of time
Mon, 26 October 2009
I knew it would happen eventually. I kept hearing people pining for an iPhone version of Photoshop. Why? I have no idea. Maybe it's the same motivation that drives people to port Linux to run on their microwave ovens just because they can. Let's see...
Whatever. So Adobe has released a companion app for their photoshop.com service called, strangely enough, Photoshop.com Mobile. It is rudimentary as an image editor and seems to be targeted more to the snapshot crowd. Although the app has some image editing/manipulation functions, its main reason for existence seems to be to get your photos on photoshop.com for sharing. This aspect is no different than the umpteen other apps which upload to MobileMe, Flickr, Facebook, or any of the other webapp services that let you share pictures. As far as editing goes, Photogene is far more powerful. On the other hand, Photogene's only "sharing" mechanism to speak of is email.
So, it was only a matter of time before we saw Photoshop on the iPhone. Fortunately, Photoshop.com Mobile resembles the desktop Photoshop application in name and publisher only.
[radarange:~ sparky]$ cook --soggy --beep-when-done leftovers 2>/dev/speech↵
leftovers cooked
[radarange:~ sparky]$ _
Whatever. So Adobe has released a companion app for their photoshop.com service called, strangely enough, Photoshop.com Mobile. It is rudimentary as an image editor and seems to be targeted more to the snapshot crowd. Although the app has some image editing/manipulation functions, its main reason for existence seems to be to get your photos on photoshop.com for sharing. This aspect is no different than the umpteen other apps which upload to MobileMe, Flickr, Facebook, or any of the other webapp services that let you share pictures. As far as editing goes, Photogene is far more powerful. On the other hand, Photogene's only "sharing" mechanism to speak of is email.
So, it was only a matter of time before we saw Photoshop on the iPhone. Fortunately, Photoshop.com Mobile resembles the desktop Photoshop application in name and publisher only.
In stitches
Tue, 30 June 2009
AutoStitch 1.0 is an iPhone photo-stitching app from Cloudburst Research. Photo-stitching is the process of combining multiple photographs to make a larger photo (typically a panorama). This can be advantageous when a scene is too large for the field of view of the lens(es) you have on hand or if you can’t back away far enough to get the whole subject in a scene.
AutoStitch’s performance is reasonable on a 1st-gen iPhone. If you try to stitch a scene with more than about 45 photos, AutoStitch will crash. I suspect that is a memory limitation of the phone, not a problem with the app.
When you first launch AutoStitch, you get a screen from which to choose the album that contains the photos you want to stitch:

You get to select individual photos once you’ve selected the album:

You’ll notice I took a photo of my hand. That is a handy way (pardon the pun) of easily finding the beginning and end of a sequence that you plan to stitch together. It can be hard to tell which photos are which from the small, square thumbnail images so having “bookends” speeds up the selection process. To select photos to add to the stitch, just touch them. They go into the well at the bottom of the screen:

When you’ve selected all the photos you want to include in a particular stitch, tap the “Stitch” button and away you go:


One nice feature is that the app displays the panorama as it’s building it, so you can watch it appear on your screen:


The scene I’m using in these examples isn’t necessarily a pretty one, but it does test the limits of the app. There is a good mix of strong lines and amorphous features. Here is the finished panorama stitched together from photos taken from one spot. In other words, I stood in one spot and rotated my body as I took the shots:

AutoStitch seems to use an algorithm that isn’t as sophisticated as one you would find on a desktop application. I wouldn’t expect an app for a handheld mobile device to be able to compete with a desktop app, so that’s not necessarily a knock against AutoStitch. Here is a section of the photo above, which shows that AutoStitch had some trouble with the items in the background like the pattern of the brick and the tree trunk:

Another area where AutoStitch had trouble was dealing with a linear capture sequence. In other words, instead of standing in one spot and rotating, I walked down the line as I took photos. The iPhone stayed perpendicular to the subject for all the shots.

The results are, as engineers would say, suboptimal.
My conclusion is that AutoStitch is a worthy photo stitching app for a mobile device. At the time of this review, it only costs $1.99 so you wouldn’t be risking a lot of money to see if the app meets your needs. It is a version 1.0 app, also, so there is a very good chance the publisher will improve upon the minor weaknesses I’ve noted above.
AutoStitch’s performance is reasonable on a 1st-gen iPhone. If you try to stitch a scene with more than about 45 photos, AutoStitch will crash. I suspect that is a memory limitation of the phone, not a problem with the app.
When you first launch AutoStitch, you get a screen from which to choose the album that contains the photos you want to stitch:
You get to select individual photos once you’ve selected the album:
You’ll notice I took a photo of my hand. That is a handy way (pardon the pun) of easily finding the beginning and end of a sequence that you plan to stitch together. It can be hard to tell which photos are which from the small, square thumbnail images so having “bookends” speeds up the selection process. To select photos to add to the stitch, just touch them. They go into the well at the bottom of the screen:
When you’ve selected all the photos you want to include in a particular stitch, tap the “Stitch” button and away you go:
One nice feature is that the app displays the panorama as it’s building it, so you can watch it appear on your screen:
The scene I’m using in these examples isn’t necessarily a pretty one, but it does test the limits of the app. There is a good mix of strong lines and amorphous features. Here is the finished panorama stitched together from photos taken from one spot. In other words, I stood in one spot and rotated my body as I took the shots:
AutoStitch seems to use an algorithm that isn’t as sophisticated as one you would find on a desktop application. I wouldn’t expect an app for a handheld mobile device to be able to compete with a desktop app, so that’s not necessarily a knock against AutoStitch. Here is a section of the photo above, which shows that AutoStitch had some trouble with the items in the background like the pattern of the brick and the tree trunk:
Another area where AutoStitch had trouble was dealing with a linear capture sequence. In other words, instead of standing in one spot and rotating, I walked down the line as I took photos. The iPhone stayed perpendicular to the subject for all the shots.
The results are, as engineers would say, suboptimal.
My conclusion is that AutoStitch is a worthy photo stitching app for a mobile device. At the time of this review, it only costs $1.99 so you wouldn’t be risking a lot of money to see if the app meets your needs. It is a version 1.0 app, also, so there is a very good chance the publisher will improve upon the minor weaknesses I’ve noted above.
A gene-genie
Mon, 22 June 2009
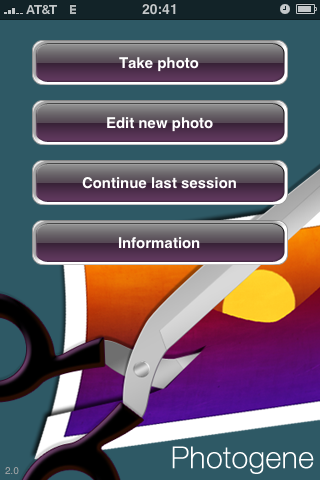
With 50,000+ apps in the App Store now, it is easy for good ones to get lost in the din. A good one that I heard about and subsequently tried is Photogene (apparently pronounced like “photo genie”) by Omer Shoor. Some have said, based on assumptions from the screenshots they’ve seen, that it is Photoshop for your phone. It is not, nor is it intended to be. It has a few features that are similar to features in Photoshop, but that is where the similarity ends. Photogene allows one to make common improvements to snapshot photos from the iPhone’s camera (some of which are potentially unnecessary with the 3G S’s new cam) and do fun things with them. When you first fire up the app, you have the choice to take a new picture, use an existing picture from your library, or continue your last editing session. The “Information” button takes you to the user’s manual.
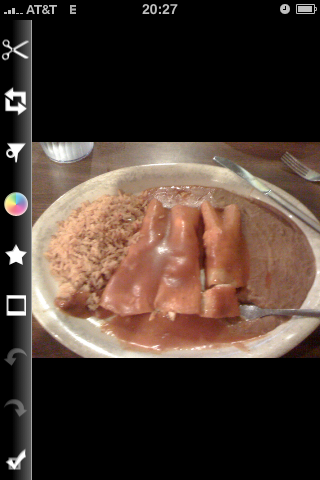
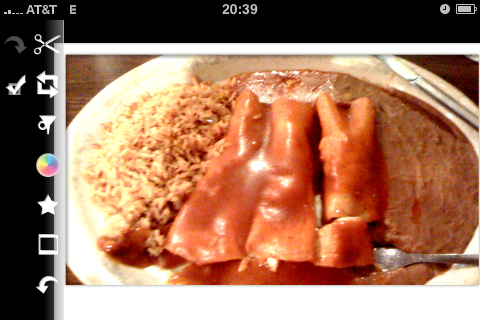
For this review, I’ll be using this picture of Enchiladas ál Carbón de Pollo.

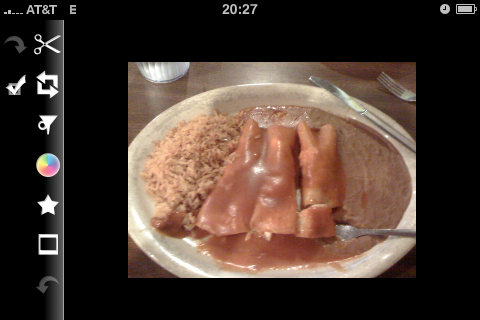
Here, I chose the “Edit new photo” button and then selected the picture from my Camera Roll. Since it is a landscape-format image, I then rotated the phone for more usable area.
Here, I select the Levels tool, adjust the black point and gamma, then try the Auto button.
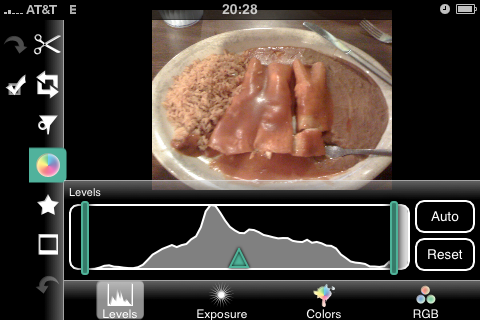
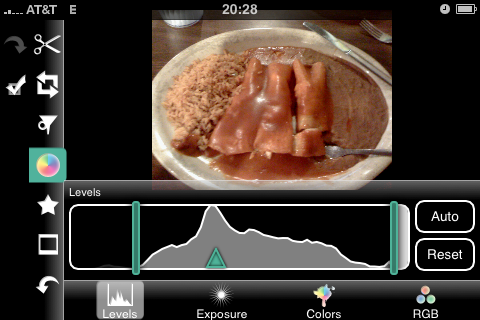

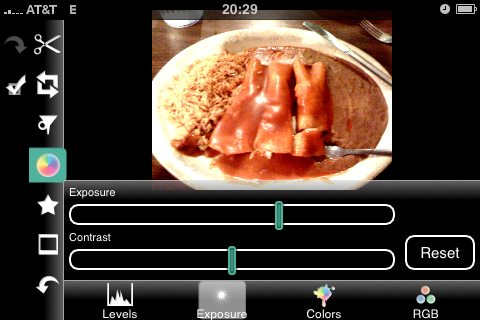
These controls work quite well and give live feedback. Then I played around with the exposure/contrast adjustments.
On the Colors tab, I desaturated the image to simulate black and white.
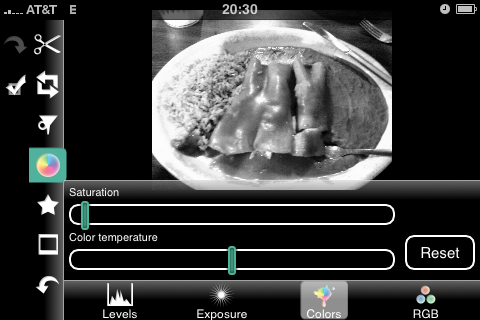
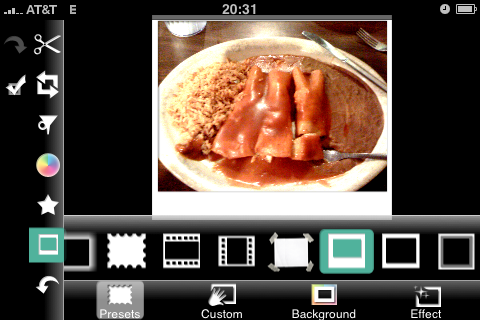
I found the desaturation result much better than that from Photoshop’s desaturation. The result was closer to what I would expect from Photoshop’s Black and White adjustment layer. Next up is the “Shape” tool.
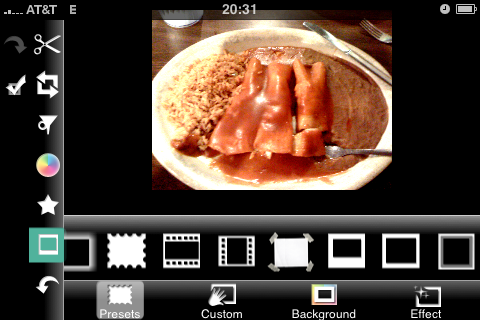
As you can see, it comes with quite a few preset shapes. I did not try the Custom, Background, or Effect tabs. Below you can see me using the frame that looks like a Polaroid photo.
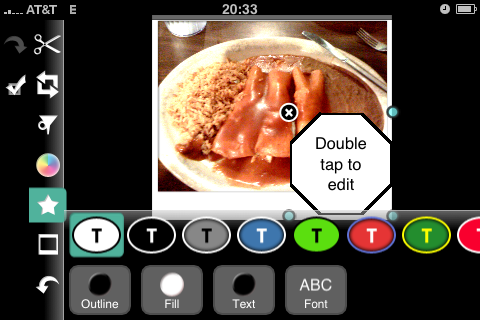
Here, I’ve dragged an octagon onto the photo. You can see three drag handles in the corners and a delete button in the upper left. In the second shot, you’ll see I’ve manipulated the size and position of the shape.
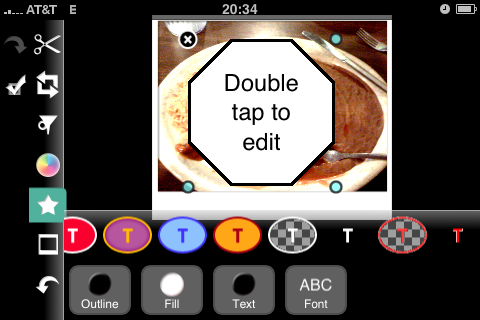
There is, of course, a sharpen filter. I found that it was hard to over-sharpen the image, which is good. Many of the app’s users will likely be inexperienced and thus prone to being a bit heavy-handed (or heavy-fingered, as the case may be). Note that I have also changed the color and opacity of the octagon shape.
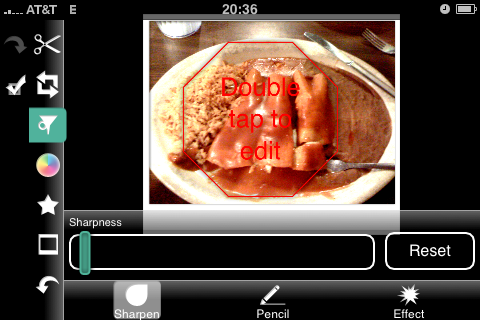
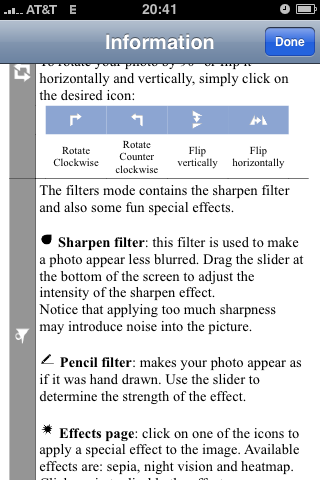
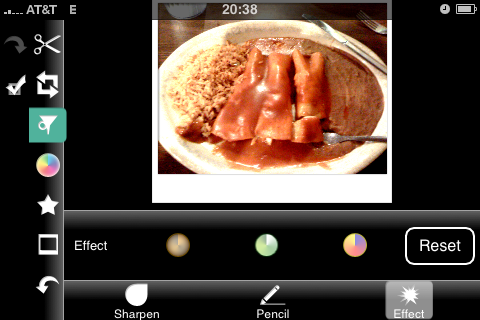
The Pencil filter gives the image the appearance of being drawn in pencil. The effect was not very interesting with our enchiladas, but probably would be with a more suitable source image. The Effect filter allows one to produce a sepia, color negative, or false-color image. The false-color effect is similar to what you would see from a thermal camera. (No effects applied in the photo below)
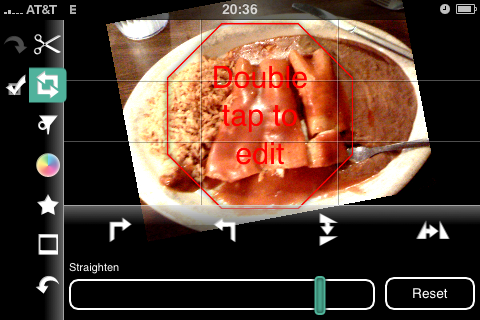
Moving on, this is the straighten tool. The straighten tool conveniently provides a grid for judging straightness and the rule-of-thirds intersection points. This is a nice touch.
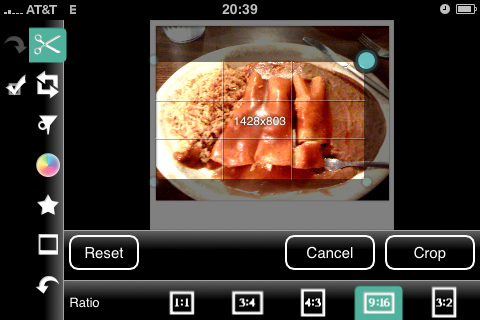
Cropping is an important feature in any image editor, and Photogene provides a crop tool. In the image below, I have selected the tool and am looking at the initial (default) crop area.
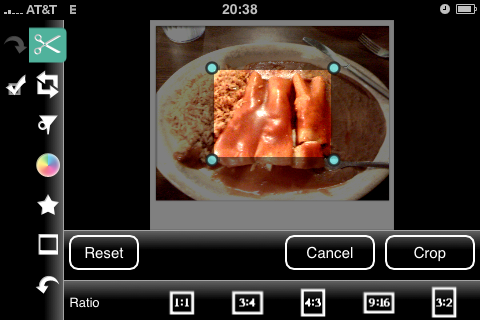
As you can see, there are presets for common aspect ratios. The following shot also shows the helpful rule-of-thirds grid and pixel dimension indicator. Those are both thoughtful features.
After canceling the crop operation, I tried a pinch gesture to see if the author had implemented zoom. Indeed, he had.
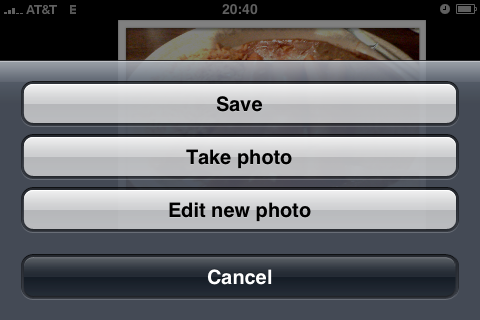
When you are done editing, touch the checkmark to bring up the save button.
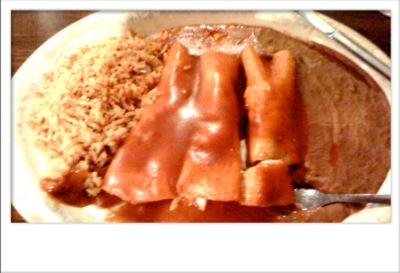
And here we are, the image as saved from Photogene (scaled to 25% to fit this screen).
My overall impression of Photogene is that it is surprisingly full-featured for a version 1.0 product that runs on a handheld device. I did not encounter any crashes or unexpected behavior. I found the crop and straighten icons a bit confusing, but usability was otherwise quite good. The app’s startup time is agonizingly long but, once running, responsiveness was good. I anticipate the author adding a few more features and tools as the app matures, but hopefully he will continue resisting the temptation to cram too many features into the product.
For this review, I’ll be using this picture of Enchiladas ál Carbón de Pollo.
Here, I chose the “Edit new photo” button and then selected the picture from my Camera Roll. Since it is a landscape-format image, I then rotated the phone for more usable area.
Here, I select the Levels tool, adjust the black point and gamma, then try the Auto button.
These controls work quite well and give live feedback. Then I played around with the exposure/contrast adjustments.
On the Colors tab, I desaturated the image to simulate black and white.
I found the desaturation result much better than that from Photoshop’s desaturation. The result was closer to what I would expect from Photoshop’s Black and White adjustment layer. Next up is the “Shape” tool.
As you can see, it comes with quite a few preset shapes. I did not try the Custom, Background, or Effect tabs. Below you can see me using the frame that looks like a Polaroid photo.
Here, I’ve dragged an octagon onto the photo. You can see three drag handles in the corners and a delete button in the upper left. In the second shot, you’ll see I’ve manipulated the size and position of the shape.
There is, of course, a sharpen filter. I found that it was hard to over-sharpen the image, which is good. Many of the app’s users will likely be inexperienced and thus prone to being a bit heavy-handed (or heavy-fingered, as the case may be). Note that I have also changed the color and opacity of the octagon shape.
The Pencil filter gives the image the appearance of being drawn in pencil. The effect was not very interesting with our enchiladas, but probably would be with a more suitable source image. The Effect filter allows one to produce a sepia, color negative, or false-color image. The false-color effect is similar to what you would see from a thermal camera. (No effects applied in the photo below)
Moving on, this is the straighten tool. The straighten tool conveniently provides a grid for judging straightness and the rule-of-thirds intersection points. This is a nice touch.
Cropping is an important feature in any image editor, and Photogene provides a crop tool. In the image below, I have selected the tool and am looking at the initial (default) crop area.
As you can see, there are presets for common aspect ratios. The following shot also shows the helpful rule-of-thirds grid and pixel dimension indicator. Those are both thoughtful features.
After canceling the crop operation, I tried a pinch gesture to see if the author had implemented zoom. Indeed, he had.
When you are done editing, touch the checkmark to bring up the save button.
And here we are, the image as saved from Photogene (scaled to 25% to fit this screen).
My overall impression of Photogene is that it is surprisingly full-featured for a version 1.0 product that runs on a handheld device. I did not encounter any crashes or unexpected behavior. I found the crop and straighten icons a bit confusing, but usability was otherwise quite good. The app’s startup time is agonizingly long but, once running, responsiveness was good. I anticipate the author adding a few more features and tools as the app matures, but hopefully he will continue resisting the temptation to cram too many features into the product.