Jun 2009
In stitches
Tue, 30 June 2009 Filed in: iPhone apps
AutoStitch 1.0 is an iPhone photo-stitching app from Cloudburst Research. Photo-stitching is the process of combining multiple photographs to make a larger photo (typically a panorama). This can be advantageous when a scene is too large for the field of view of the lens(es) you have on hand or if you can’t back away far enough to get the whole subject in a scene.
AutoStitch’s performance is reasonable on a 1st-gen iPhone. If you try to stitch a scene with more than about 45 photos, AutoStitch will crash. I suspect that is a memory limitation of the phone, not a problem with the app.
When you first launch AutoStitch, you get a screen from which to choose the album that contains the photos you want to stitch:

You get to select individual photos once you’ve selected the album:

You’ll notice I took a photo of my hand. That is a handy way (pardon the pun) of easily finding the beginning and end of a sequence that you plan to stitch together. It can be hard to tell which photos are which from the small, square thumbnail images so having “bookends” speeds up the selection process. To select photos to add to the stitch, just touch them. They go into the well at the bottom of the screen:

When you’ve selected all the photos you want to include in a particular stitch, tap the “Stitch” button and away you go:


One nice feature is that the app displays the panorama as it’s building it, so you can watch it appear on your screen:


The scene I’m using in these examples isn’t necessarily a pretty one, but it does test the limits of the app. There is a good mix of strong lines and amorphous features. Here is the finished panorama stitched together from photos taken from one spot. In other words, I stood in one spot and rotated my body as I took the shots:

AutoStitch seems to use an algorithm that isn’t as sophisticated as one you would find on a desktop application. I wouldn’t expect an app for a handheld mobile device to be able to compete with a desktop app, so that’s not necessarily a knock against AutoStitch. Here is a section of the photo above, which shows that AutoStitch had some trouble with the items in the background like the pattern of the brick and the tree trunk:

Another area where AutoStitch had trouble was dealing with a linear capture sequence. In other words, instead of standing in one spot and rotating, I walked down the line as I took photos. The iPhone stayed perpendicular to the subject for all the shots.

The results are, as engineers would say, suboptimal.
My conclusion is that AutoStitch is a worthy photo stitching app for a mobile device. At the time of this review, it only costs $1.99 so you wouldn’t be risking a lot of money to see if the app meets your needs. It is a version 1.0 app, also, so there is a very good chance the publisher will improve upon the minor weaknesses I’ve noted above.
AutoStitch’s performance is reasonable on a 1st-gen iPhone. If you try to stitch a scene with more than about 45 photos, AutoStitch will crash. I suspect that is a memory limitation of the phone, not a problem with the app.
When you first launch AutoStitch, you get a screen from which to choose the album that contains the photos you want to stitch:
You get to select individual photos once you’ve selected the album:
You’ll notice I took a photo of my hand. That is a handy way (pardon the pun) of easily finding the beginning and end of a sequence that you plan to stitch together. It can be hard to tell which photos are which from the small, square thumbnail images so having “bookends” speeds up the selection process. To select photos to add to the stitch, just touch them. They go into the well at the bottom of the screen:
When you’ve selected all the photos you want to include in a particular stitch, tap the “Stitch” button and away you go:
One nice feature is that the app displays the panorama as it’s building it, so you can watch it appear on your screen:
The scene I’m using in these examples isn’t necessarily a pretty one, but it does test the limits of the app. There is a good mix of strong lines and amorphous features. Here is the finished panorama stitched together from photos taken from one spot. In other words, I stood in one spot and rotated my body as I took the shots:
AutoStitch seems to use an algorithm that isn’t as sophisticated as one you would find on a desktop application. I wouldn’t expect an app for a handheld mobile device to be able to compete with a desktop app, so that’s not necessarily a knock against AutoStitch. Here is a section of the photo above, which shows that AutoStitch had some trouble with the items in the background like the pattern of the brick and the tree trunk:
Another area where AutoStitch had trouble was dealing with a linear capture sequence. In other words, instead of standing in one spot and rotating, I walked down the line as I took photos. The iPhone stayed perpendicular to the subject for all the shots.
The results are, as engineers would say, suboptimal.
My conclusion is that AutoStitch is a worthy photo stitching app for a mobile device. At the time of this review, it only costs $1.99 so you wouldn’t be risking a lot of money to see if the app meets your needs. It is a version 1.0 app, also, so there is a very good chance the publisher will improve upon the minor weaknesses I’ve noted above.
Comments
A gene-genie
Mon, 22 June 2009 Filed in: iPhone apps
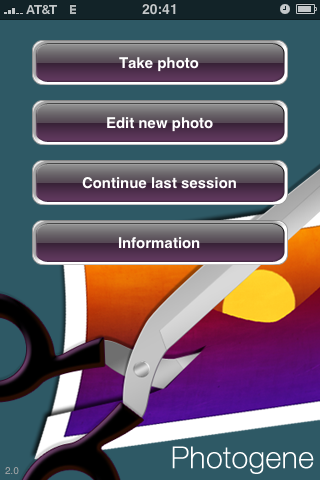
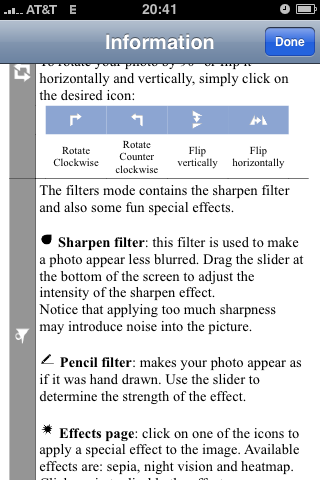
With 50,000+ apps in the App Store now, it is easy for good ones to get lost in the din. A good one that I heard about and subsequently tried is Photogene (apparently pronounced like “photo genie”) by Omer Shoor. Some have said, based on assumptions from the screenshots they’ve seen, that it is Photoshop for your phone. It is not, nor is it intended to be. It has a few features that are similar to features in Photoshop, but that is where the similarity ends. Photogene allows one to make common improvements to snapshot photos from the iPhone’s camera (some of which are potentially unnecessary with the 3G S’s new cam) and do fun things with them. When you first fire up the app, you have the choice to take a new picture, use an existing picture from your library, or continue your last editing session. The “Information” button takes you to the user’s manual.
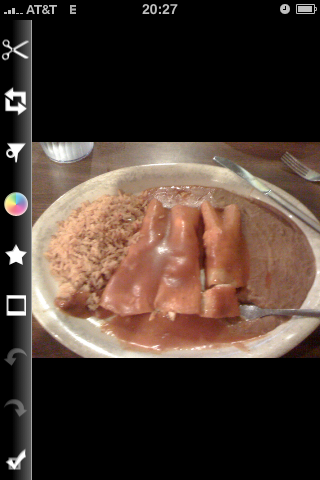
For this review, I’ll be using this picture of Enchiladas ál Carbón de Pollo.

Here, I chose the “Edit new photo” button and then selected the picture from my Camera Roll. Since it is a landscape-format image, I then rotated the phone for more usable area.
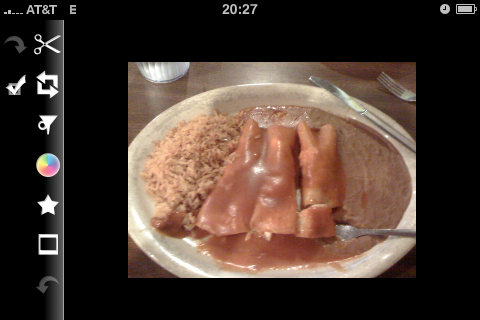
Here, I select the Levels tool, adjust the black point and gamma, then try the Auto button.
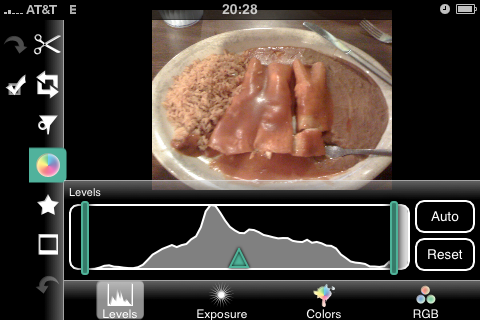
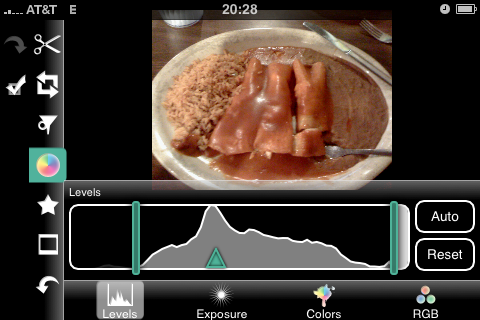

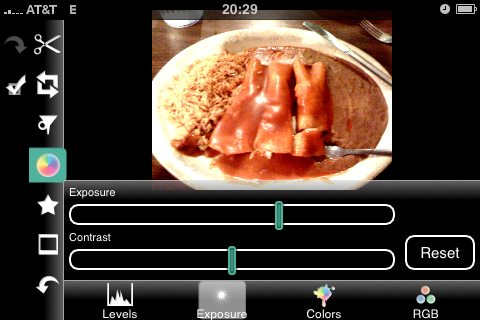
These controls work quite well and give live feedback. Then I played around with the exposure/contrast adjustments.
On the Colors tab, I desaturated the image to simulate black and white.
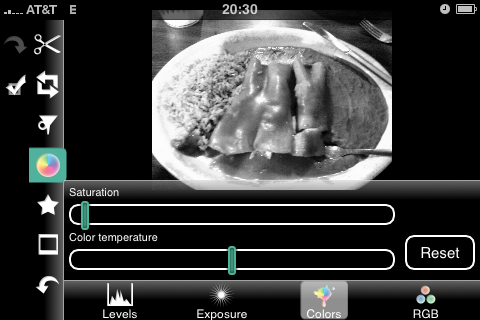
I found the desaturation result much better than that from Photoshop’s desaturation. The result was closer to what I would expect from Photoshop’s Black and White adjustment layer. Next up is the “Shape” tool.
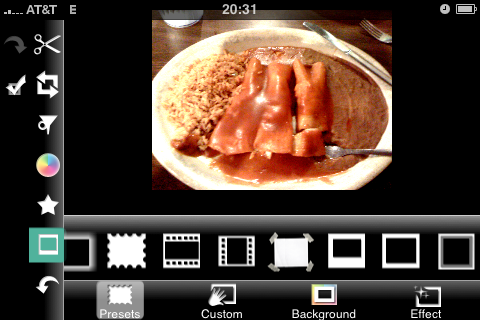
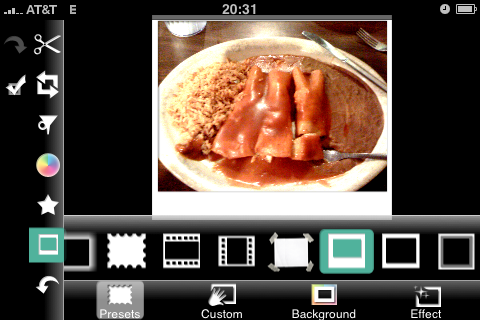
As you can see, it comes with quite a few preset shapes. I did not try the Custom, Background, or Effect tabs. Below you can see me using the frame that looks like a Polaroid photo.
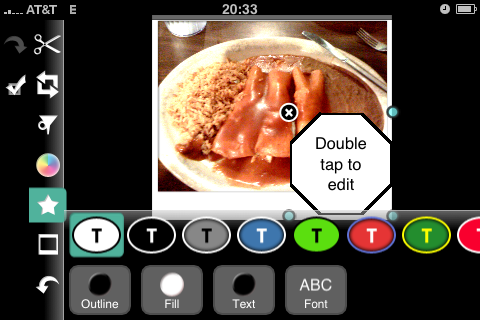
Here, I’ve dragged an octagon onto the photo. You can see three drag handles in the corners and a delete button in the upper left. In the second shot, you’ll see I’ve manipulated the size and position of the shape.
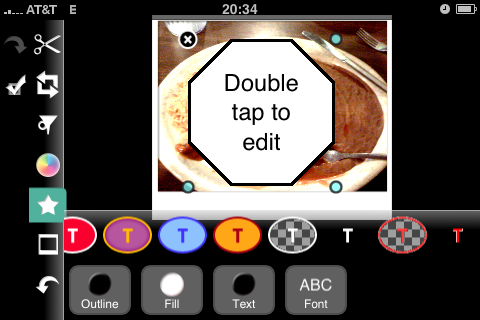
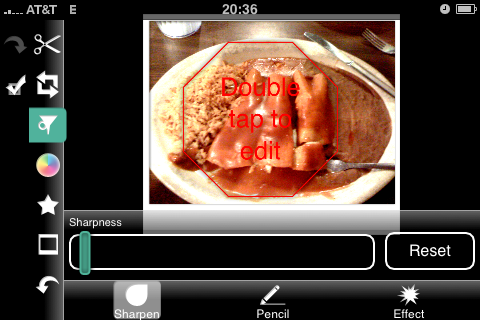
There is, of course, a sharpen filter. I found that it was hard to over-sharpen the image, which is good. Many of the app’s users will likely be inexperienced and thus prone to being a bit heavy-handed (or heavy-fingered, as the case may be). Note that I have also changed the color and opacity of the octagon shape.
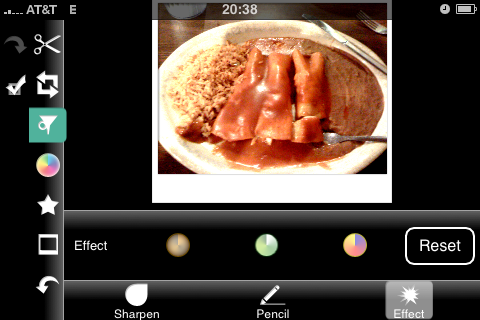
The Pencil filter gives the image the appearance of being drawn in pencil. The effect was not very interesting with our enchiladas, but probably would be with a more suitable source image. The Effect filter allows one to produce a sepia, color negative, or false-color image. The false-color effect is similar to what you would see from a thermal camera. (No effects applied in the photo below)
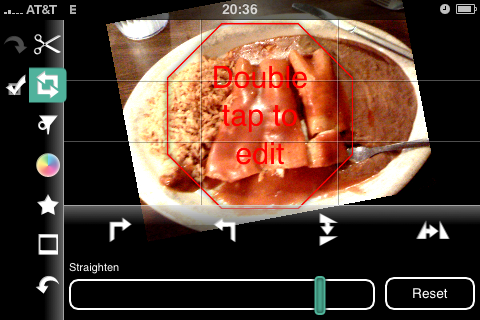
Moving on, this is the straighten tool. The straighten tool conveniently provides a grid for judging straightness and the rule-of-thirds intersection points. This is a nice touch.
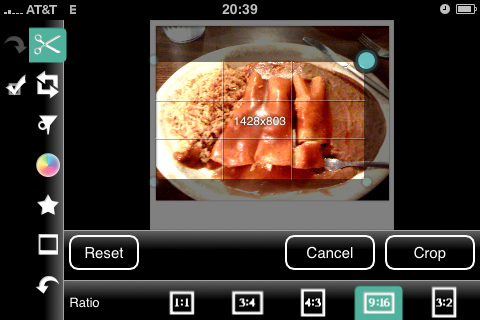
Cropping is an important feature in any image editor, and Photogene provides a crop tool. In the image below, I have selected the tool and am looking at the initial (default) crop area.
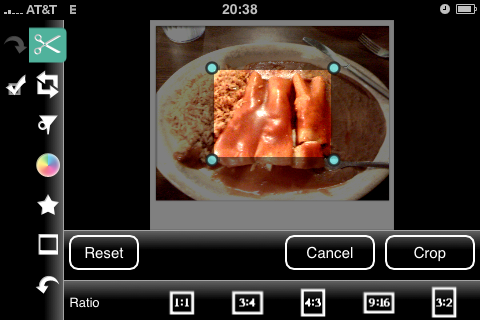
As you can see, there are presets for common aspect ratios. The following shot also shows the helpful rule-of-thirds grid and pixel dimension indicator. Those are both thoughtful features.
After canceling the crop operation, I tried a pinch gesture to see if the author had implemented zoom. Indeed, he had.
When you are done editing, touch the checkmark to bring up the save button.
And here we are, the image as saved from Photogene (scaled to 25% to fit this screen).

My overall impression of Photogene is that it is surprisingly full-featured for a version 1.0 product that runs on a handheld device. I did not encounter any crashes or unexpected behavior. I found the crop and straighten icons a bit confusing, but usability was otherwise quite good. The app’s startup time is agonizingly long but, once running, responsiveness was good. I anticipate the author adding a few more features and tools as the app matures, but hopefully he will continue resisting the temptation to cram too many features into the product.
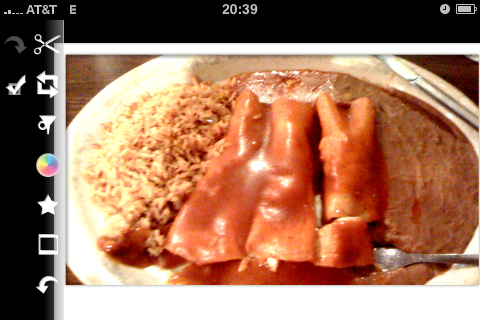
For this review, I’ll be using this picture of Enchiladas ál Carbón de Pollo.
Here, I chose the “Edit new photo” button and then selected the picture from my Camera Roll. Since it is a landscape-format image, I then rotated the phone for more usable area.
Here, I select the Levels tool, adjust the black point and gamma, then try the Auto button.
These controls work quite well and give live feedback. Then I played around with the exposure/contrast adjustments.
On the Colors tab, I desaturated the image to simulate black and white.
I found the desaturation result much better than that from Photoshop’s desaturation. The result was closer to what I would expect from Photoshop’s Black and White adjustment layer. Next up is the “Shape” tool.
As you can see, it comes with quite a few preset shapes. I did not try the Custom, Background, or Effect tabs. Below you can see me using the frame that looks like a Polaroid photo.
Here, I’ve dragged an octagon onto the photo. You can see three drag handles in the corners and a delete button in the upper left. In the second shot, you’ll see I’ve manipulated the size and position of the shape.
There is, of course, a sharpen filter. I found that it was hard to over-sharpen the image, which is good. Many of the app’s users will likely be inexperienced and thus prone to being a bit heavy-handed (or heavy-fingered, as the case may be). Note that I have also changed the color and opacity of the octagon shape.
The Pencil filter gives the image the appearance of being drawn in pencil. The effect was not very interesting with our enchiladas, but probably would be with a more suitable source image. The Effect filter allows one to produce a sepia, color negative, or false-color image. The false-color effect is similar to what you would see from a thermal camera. (No effects applied in the photo below)
Moving on, this is the straighten tool. The straighten tool conveniently provides a grid for judging straightness and the rule-of-thirds intersection points. This is a nice touch.
Cropping is an important feature in any image editor, and Photogene provides a crop tool. In the image below, I have selected the tool and am looking at the initial (default) crop area.
As you can see, there are presets for common aspect ratios. The following shot also shows the helpful rule-of-thirds grid and pixel dimension indicator. Those are both thoughtful features.
After canceling the crop operation, I tried a pinch gesture to see if the author had implemented zoom. Indeed, he had.
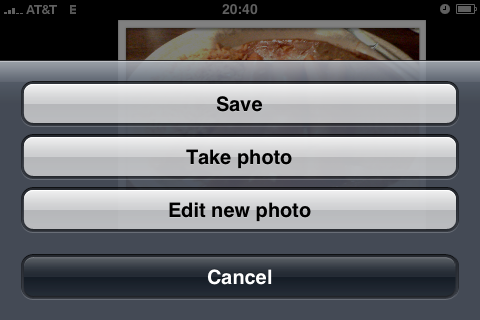
When you are done editing, touch the checkmark to bring up the save button.
And here we are, the image as saved from Photogene (scaled to 25% to fit this screen).
My overall impression of Photogene is that it is surprisingly full-featured for a version 1.0 product that runs on a handheld device. I did not encounter any crashes or unexpected behavior. I found the crop and straighten icons a bit confusing, but usability was otherwise quite good. The app’s startup time is agonizingly long but, once running, responsiveness was good. I anticipate the author adding a few more features and tools as the app matures, but hopefully he will continue resisting the temptation to cram too many features into the product.
T-minus 2 hours
Wed, 17 June 2009 Filed in: Apple
All I wanna do is zooma zoom-zoom-zoom...
Mon, 15 June 2009 Filed in: Apple | Photography
(...and a boom-boom)
With the miniaturization of electromechanical components becoming so advanced, how long will it be before Apple gives the iPhone optical zoom? What would they call it, the iPhone 3G Z? Of course the intuitive way to control the feature would be the same multi-touch pinch maneuver that we’re already accustomed to using for zooming photos, maps, and web content in and out. Hey Apple, if you use my idea then all I want is an appropriate amount of Apple stock and a free replacement of my current iPhone with the one that incorporates these features, ok? Really. Call me.
You can watch the probably NSFW music video here if you are so inclined.
Back in Black... or White
It’s hard to believe that I’ve had my iPhone for almost two years already. I am amazed that I haven’t grown tired of it or become apathetic about it. When I think back to my first cell phone, which was from the Motorola DynaTAC 8000-series, I’m amazed at how far we’ve come.
Yes, I used to own (and use) one of those; no, I’m not as old as you might think; and yes, it really was that big. See for yourself:

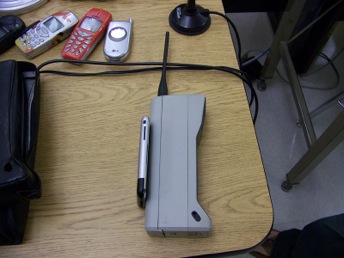
I wish now that I had kept it instead of selling it to pay for its successor. But I digress. The iPhone was as revolutionary as The Brick (as the DynaTAC was known) was in its day. The Brick was revolutionary because it gave people a capability they neither had nor could afford before. The iPhone was revolutionary because it threw out the 34-year-old user interface and replaced it with one that was in tune with the features available and made everything intuitive. And fun. When, pre-iPhone, did you ever think using your cell phone was fun? Never?
OK, so here we are just about two years after Apple introduced the world to what a phone could be. Earlier this week, they introduced the iPhone 3G S. While certainly not revolutionary like the original iPhone, it is a definite evolution and a major refinement of iPhone’s capabilities and usability. From a photographer’s point of view, however, the 3G S really is a huge improvement over the 3G and original iPhone. I dare say that taken in toto, the photographic capabilities may be revolutionary.
Let’s get the obvious stuff out of the way first. The first two iterations of the iPhone had pretty rudimentary (read “crappy”) cameras as I, and many others, have noted. Several improvements will appear on the iPhone 3G S.
So, why are the improvements in the 3G S’s camera so noteworthy? Let’s take the example of autofocus. Not many phones have autofocus cameras yet. That in itself makes autofocus on the 3G S novel, but what I think is really interesting is the touch-to-focus feature. Instead of doing the dance where one puts the desired point of focus in the middle of the viewfinder, presses the shutter half-way to focus on that area, then recomposes the picture the way it should have been in the first place, the person taking the photo can compose the shot and then very intuitively change the point of focus without modifying the composition. This reminds me of Canon’s so-called “eye focus” technology from the EOS Elan and EOS 3 film cameras that caused the camera to focus on the portion of the viewfinder at which the photographer was looking. Why hasn’t this technology made it into the digital SLRs yet? One last comment about autofocus: it could allow the camera to record the approximate distance to the subject (we’ll have to wait until the 19th to find out whether or not the 3G S does). This, combined with the GPS and new compass, would make it possible to determine the position not only of the camera, but also of the subject. The next level of geocoding! Imagine tapping (or clicking) on a photo and seeing a Google Map with pins denoting the location of the camera and the subject! This capability would have been so incredibly useful on my 2005 trip to China. I predict that we will start seeing this same capability in dSLRs in two years or less.
I didn’t intend for this entry to become so long. I think I’ll pause here and finish my thoughts in the next entry within a day or two. Oh, in case you were wondering, the title of this entry refers not only to the fact that the blog is alive again, but also to the two colors in which the iPhone 3G S will initially be available.

Dr. Martin Cooper, lead engineer of the team that developed the first hand-held cellular telephone, holding a Motorola DynaTAC 8000x
Yes, I used to own (and use) one of those; no, I’m not as old as you might think; and yes, it really was that big. See for yourself:
I wish now that I had kept it instead of selling it to pay for its successor. But I digress. The iPhone was as revolutionary as The Brick (as the DynaTAC was known) was in its day. The Brick was revolutionary because it gave people a capability they neither had nor could afford before. The iPhone was revolutionary because it threw out the 34-year-old user interface and replaced it with one that was in tune with the features available and made everything intuitive. And fun. When, pre-iPhone, did you ever think using your cell phone was fun? Never?
OK, so here we are just about two years after Apple introduced the world to what a phone could be. Earlier this week, they introduced the iPhone 3G S. While certainly not revolutionary like the original iPhone, it is a definite evolution and a major refinement of iPhone’s capabilities and usability. From a photographer’s point of view, however, the 3G S really is a huge improvement over the 3G and original iPhone. I dare say that taken in toto, the photographic capabilities may be revolutionary.
Let’s get the obvious stuff out of the way first. The first two iterations of the iPhone had pretty rudimentary (read “crappy”) cameras as I, and many others, have noted. Several improvements will appear on the iPhone 3G S.
- Apple claims that low-light performance will be much better on the 3G S.
- The 3G S will have an autofocus camera instead of the fixed-focus camera that previous generations, and indeed most cell phones, have. More on that below.
- It will have a built-in macro mode. The current iPhone camera has a pretty long minimum focusing distance because of its fixed-focus lens. This hinders it not only for artistic photos, but also for application-driven imaging like capturing and decoding barcodes.
- Video
- The addition of a GPS receiver in the 3G made iPhone’s photo geocoding much more accurate. The introduction of a magnetic compass in the 3G S will fill the last major missing capability needed to enable some very interesting applications.
So, why are the improvements in the 3G S’s camera so noteworthy? Let’s take the example of autofocus. Not many phones have autofocus cameras yet. That in itself makes autofocus on the 3G S novel, but what I think is really interesting is the touch-to-focus feature. Instead of doing the dance where one puts the desired point of focus in the middle of the viewfinder, presses the shutter half-way to focus on that area, then recomposes the picture the way it should have been in the first place, the person taking the photo can compose the shot and then very intuitively change the point of focus without modifying the composition. This reminds me of Canon’s so-called “eye focus” technology from the EOS Elan and EOS 3 film cameras that caused the camera to focus on the portion of the viewfinder at which the photographer was looking. Why hasn’t this technology made it into the digital SLRs yet? One last comment about autofocus: it could allow the camera to record the approximate distance to the subject (we’ll have to wait until the 19th to find out whether or not the 3G S does). This, combined with the GPS and new compass, would make it possible to determine the position not only of the camera, but also of the subject. The next level of geocoding! Imagine tapping (or clicking) on a photo and seeing a Google Map with pins denoting the location of the camera and the subject! This capability would have been so incredibly useful on my 2005 trip to China. I predict that we will start seeing this same capability in dSLRs in two years or less.
I didn’t intend for this entry to become so long. I think I’ll pause here and finish my thoughts in the next entry within a day or two. Oh, in case you were wondering, the title of this entry refers not only to the fact that the blog is alive again, but also to the two colors in which the iPhone 3G S will initially be available.
A contemporary photo of Dr. Cooper with a 1973 prototype of the DynaTAC. Notice the keyboard layout and the complete lack of a display. Notice also the puzzled look of the man in the background who probably hadn’t even been born yet in 1973.
