Mar 2010
A Case for iPhone HDR
Some may wonder why anyone would want to do high dynamic range (HDR) photography on their iPhone. I have to admit, I wondered that myself when I saw the TrueHDR app in the App Store. What I've found over the past few months of playing with TrueHDR (v1.0.1 at the time of this writing) is that it can help make up for some of the iPhone camera's deficiencies.
One of the problems with the iPhone camera is that the colors are often flat. I suppose color rendering ability is one of the areas in which designers have to compromise to cram a several megapixel sensor and optics into the space available in a cell phone. Phone cameras also are often used in less-than-ideal lighting situations. The question arises, then, what to do to compensate for poor rendering. Quite by accident, I discovered that TrueHDR may be one of the answers to that question.
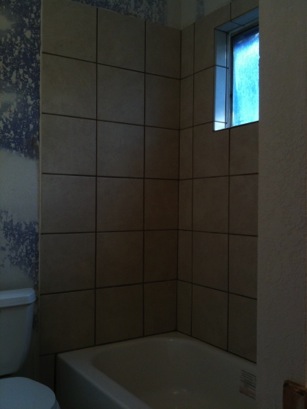
I took the following two photos using TrueHDR's integrated picture-taking feature. One is exposed for the highlights and the other for the shadows. On their own, neither is remarkable (nor is the photo I took with the built-in Camera app).
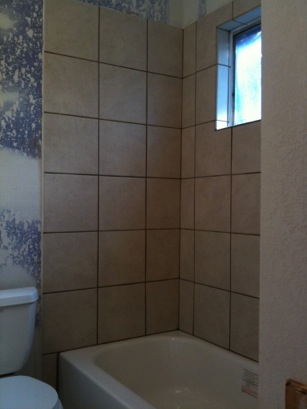
The exposures are actually pretty similar — more similar than they appear here on the Web. I expected a wider spread than what we see. However, when I told the app to merge the two exposures to compress the dynamic range, I got a photo that is much more true to the scene:

The result is a bit too saturated, particularly in the blue range (probably a white balance issue in the source images), but the overall color is more accurate.
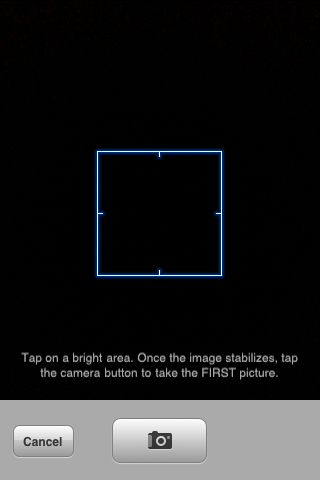
The app is straightforward and easy to use. It presents a screen upon launch which lets the user take pictures with the camera or use pictures from the iPhone photo library. If the user chooses to take pictures, a camera preview appears with instructions to tap on a bright area in the photo. Below is a screenshot of such a screen with the preview area dark to make it easy to read the instructions.
Once the user takes the first picture, similar instructions tell the user to tap on a dark area and take the second picture. The user then comes to a screen similar to this one:
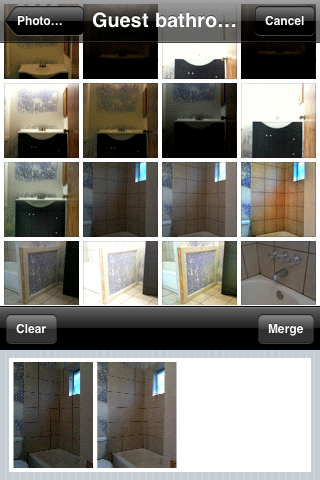
The screenshot above is actually what the user sees when merging photos from the library. When taking pictures, the user continues to see the camera preview in the top section of the screen instead of the photo chooser as seen here. Once you have the two photos to be merged showing in the bottom section, press the Merge button to have TrueHDR align and merge the images.


There you have it! Simple, easy to use, and effective. There are a few so-called HDR apps in the app store which do nothing more than apply a saturation boost to a single photo. The only other app at the time of this writing that does true HDR is Pro HDR. I intend to give that a whirl soon since it is the same price as TrueHDR but looks like it gives the user more control over the results. I will post a brief writeup about the app once I have purchased and used it.
One of the problems with the iPhone camera is that the colors are often flat. I suppose color rendering ability is one of the areas in which designers have to compromise to cram a several megapixel sensor and optics into the space available in a cell phone. Phone cameras also are often used in less-than-ideal lighting situations. The question arises, then, what to do to compensate for poor rendering. Quite by accident, I discovered that TrueHDR may be one of the answers to that question.
I took the following two photos using TrueHDR's integrated picture-taking feature. One is exposed for the highlights and the other for the shadows. On their own, neither is remarkable (nor is the photo I took with the built-in Camera app).
The exposures are actually pretty similar — more similar than they appear here on the Web. I expected a wider spread than what we see. However, when I told the app to merge the two exposures to compress the dynamic range, I got a photo that is much more true to the scene:
The result is a bit too saturated, particularly in the blue range (probably a white balance issue in the source images), but the overall color is more accurate.
The app is straightforward and easy to use. It presents a screen upon launch which lets the user take pictures with the camera or use pictures from the iPhone photo library. If the user chooses to take pictures, a camera preview appears with instructions to tap on a bright area in the photo. Below is a screenshot of such a screen with the preview area dark to make it easy to read the instructions.
Once the user takes the first picture, similar instructions tell the user to tap on a dark area and take the second picture. The user then comes to a screen similar to this one:
The screenshot above is actually what the user sees when merging photos from the library. When taking pictures, the user continues to see the camera preview in the top section of the screen instead of the photo chooser as seen here. Once you have the two photos to be merged showing in the bottom section, press the Merge button to have TrueHDR align and merge the images.
There you have it! Simple, easy to use, and effective. There are a few so-called HDR apps in the app store which do nothing more than apply a saturation boost to a single photo. The only other app at the time of this writing that does true HDR is Pro HDR. I intend to give that a whirl soon since it is the same price as TrueHDR but looks like it gives the user more control over the results. I will post a brief writeup about the app once I have purchased and used it.
Comments